Showing posts with label craft. Show all posts

Thursday, June 7, 2018

Create It! - Hospital

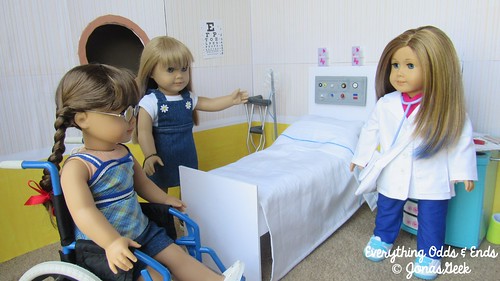
I created a hospital for dolls and I am very excited to share it with all of you.

The doctor outfit was created by me.  I used McCalls Pattern #M7031 for the coat, and a pattern from this blog for the scrubs and hospital gown.

Most of the crafts I made myself, either being inspired by other crafts I found online or tutorials from the blog I posted above.

Without further ado, here is the photo shoot!

001


Thursday, May 31, 2018

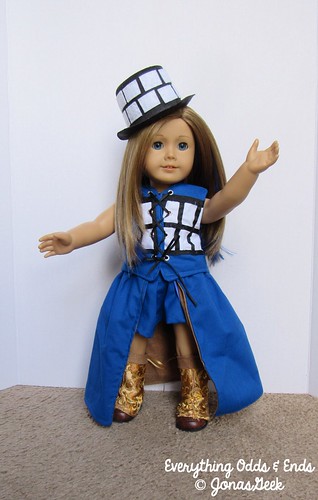
TARDIS Outfit!

I am very excited to show you the TARDIS outfit I sewed for my dolls!  Cassidy is our model for today.

001


Monday, May 29, 2017

Create It! - Stage

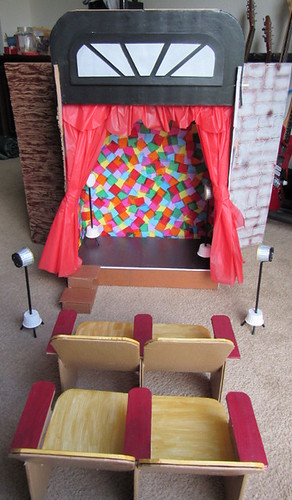
I have always wanted Molly's Stage, but it was very expensive when it was released and it's quite expensive now since it's retired permanently.  So I made my own homemade modern version of it.  I love it.  And most of the supplies I used came from the Dollar Tree.
I glued two tri-folds together, back to back, that is how I created this look.

IMG_4140

Here it is!


Saturday, July 16, 2016

Craft Preview...


I have been working on this craft for the past few days and it's almost done, just a few more things to do.  Any guesses?

Have a wonderday!

Thursday, January 14, 2016

Crafting Update!

I was excited to finally be able to buy some new craft supplies and boy did I get to work!

I bought the mail box last year around Valentine's Day at Target for a $1, and then bought a wooden candlestick holder from Hobby Lobby for $2.  I painted the candlestick silver and glued the mailbox onto using E6000 glue to make sure it won't fall apart.


I knew I needed some pots for my doll, so I set to work.  Using cardboard, glue, paint, and Modpodge, I made these pots.  They open up and look great with the dolls!


Next I made a lot of food.  I used cornstarch dough for most of it.  I used pastels and paint for coloring, and then coated everything in Modpodge.

Here is some carrots and celery!  You'll see why I made these later.  : )


Hot pretzels are a great and yummy treat!  These are so cute!


Can't forget about the cookies!  By the way, I used Modpodge to attach the salt to the pretzels, and the chocolate chips to the cookies!


Since I wanted some bread, I made these pull apart rolls we make at my house all the time.  I love how they turned out.


I wanted to make some meal items, so I made spaghetti with meatballs!  I made the meatballs separately so they could be removable.


Who doesn't love waffles!  I used the MyFroggyStuff tutorial for making these along with the syrup to go on top.  It was so easy and they were fun to make!


I love soup, especially with the cold winter we are having right now in Michigan.  So I made chicken noodle soup and tomato soup!  My favorites!


To make the broth, I colored the inside of a plastic cup with washable markers (I used the Crayola brand), I used lots of yellow, a little green, and few dots of brown, then I poured in some Modpodge and mixed it all together.  I poured the Modpodge mixture into the bowl, then I took the clay pieces I made to resemble chicken, celery, carrots, and noodles, and scattered them through the bowl.  I wanted most of the glue to dry, then put a thin layer of the Modpodge mixture on top.  I thought it turned out great.


For the tomato soup, I mixed together white glue along with some red paint, and a few drops of brown.  I dusted some green pastel on top to add the look of a little flavor and let it dry.  Both of these soups took about 3 days to dry thoroughly.


And that is what I have been working on the past few weeks!  I'm happy with how most of my creations turned out.  It was my first time doing a lot of this and found it to be fun.  I hope to make more in the future!

Have a wonderday!

Monday, November 9, 2015

TV, Blu-ray/DVD Player, & Remote!

Over the summer I had some fun crafting and creating!  I watched a MyFroggyStuff's video and I thought I could do that too.  So I set to work and it turned out pretty cool.

I was planning on posting this sooner, but AG released a set with all of the things I made, so I thought no one would be interested, but I wanted to share because I worked hard on it.  All of these crafts were made with recycled paper board (thin cardboard), plastic from old packaging, nail file or sand paper, glue, scissors, and small rhinestones (I was going to use punched out foam until I found the rhinestones, so either works!).  So it was a fairly simple, but time consuming craft.

So here we go!


I wanted to make a TV for my doll that could have the slides change with different scenes, so I found some plastic from an empty package and started to experiment.


As you can see, I had to use quite a bit ot hold up the TV.  I do like how it turned out though.  I haven't made any scenes to go into the TV yet, but I will make some soon!

And here is a side view of the TV.  I used small rhinestones as the buttons.


To go with the TV, I knew I needed a remote.  It may be a little small, but I don't mind.  I even made it so the rhinestones correlate with the buttons on the TV.


And here is Emily holding the remote to show you the size.


Lastly, I made a Blu-ray/DVD Player.  I wanted to make it so you could put in a disc, and I love how it turned out.


I made a test disc to show how it worked.  I plan to make a set of movies for my doll when I can.


Alright, well I suppose that is it!  I'm not going to make a how-to craft on this because it was a test project and I followed an already made tutorial, but I wanted to show you what I made.


And here is Emily watching...well, nothing right now, but soon she will have all kinds of things to watch!  And I need to make a stand for the electronics too!

I hope you enjoyed!  If you have an questions about what I did, you can ask and I will try my best to answer.  Have a wonderday!

Monday, October 26, 2015

Halloween Treat Bags


With Halloween approaching, I thought I would make a fun printable!  So let's get started!

What you need:

The first thing you will need to do is print your treat bags!  I decided this time to print the black and white version on colored paper, but you can print and color any version you wish.


Now you need to cut out your templates.  I chose to add a bit of color to some of the bags, like making the ghosts white and adding some silver on the witch's hats.

  
After cutting out the template, I used a ruler and scissors to score the edges, to make it easier to bend the paper.  This will also give smoother fold marks.


You will need to carefully score the four small tabs on tab, so the ribbon/string can poke through it.


I cut two 6 inch pieces of string for my handles.  You need two for each bag.


I started by pulling the string through carefully through the slits we made.


I used a little glue to hold down the strings and then taped them to the inside.


Next take all four of the top tabs and fold them down.  You can just use tape or glue.  I did both because I wanted them to last a while.  This is the inside of the bag, so you won't be seeing it anyways.


Now you want to take the small tab right side putting some glue on it or using tape, and connect it to the left side.  Then you need to fold up your bottom pieces and you have a fun Halloween Treat bag!


I had fun making these because they were quick and easy.


You can even add some of your favorite doll treats for some added trick or treat fun!


I hope you enjoyed and if you have any questions leave a comment!

Have a wonderday!


Monday, September 14, 2015

Friendship Bracelets

Hello everyone!  The other day I was sitting and I saw how I had a whole bag of embroidery thread or floss (you could use yarn too).  I went on YouTube and found this great DIY Friendship Bracelet video!  I made a few for my doll and even made a few matching ones for myself!

Here are the one's I made for my doll.

Rope bracelet:


(I made an ankle one too!)

Fishtail bracelet:

These are my favorite ones to make.


Striped Friendship Bracelet:

These bracelets take a long time to make and you need to be careful when pulling the strings.  The more practice I had, the better they turned out.  As you can see in the black and white one I made a few of the knots weren't quite right, but that's okay.


I even made some to match me and my doll!


There we go!  I had so much fun making these and I wear them every day now!  You can give them a try too.

Have a wonderday!